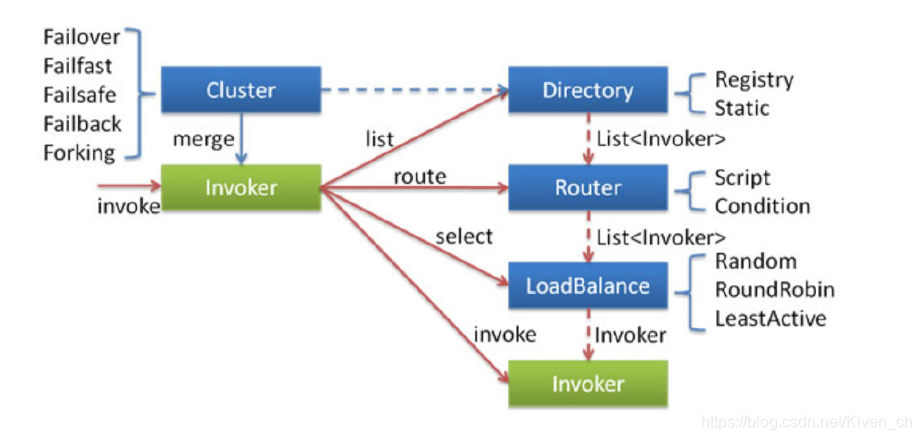
先介绍一下集群容错的所有组件。包含 Cluster、Cluster Invoker、Directory、Router 和 LoadBalance 等。
集群工作过程可分为两个阶段
- 第一个阶段是在服务消费者初始化期间,集群 Cluster 实现类为服务消费者创建
ClusterInvoker实例,即上图中的merge操作。 - 第二个阶段是在服务消费者进行远程调用时。以
FailoverClusterInvoker为例,该类型ClusterInvoker首先会调用Directory的list方法列举Invoker列表(可将 Invoker 简单理解为服务提供者 )。Directory的用途是保存Invoker列表,可简单类比为 List。其实现类RegistryDirectory是一个动态服务目录,可感知注册中心配置的变化 ,它所持有的 Invoker 列表会随着注册中心内容的变化而变化 。每次变化后,RegistryDirectory会动态增删Invoker,并调用Router的route方法进行路由 ,过滤掉不符合路由规则的 Invoker。当FailoverClusterInvoker拿到Directory返回的Invoker列表后,它会通过LoadBalance从Invoker列表中选择一个Invoker。最后FailoverClusterInvoker会将参数传给LoadBalance选择出的Invoker实例的invoke方法,进行真正的远程调用。
Dubbo 主要提供了这样几种容错方式:
- Failover Cluster - 失败自动切换 失败时会重试其它服务器
- Failfast Cluster - 快速失败 请求失败后快速返回异常结果 不重试
- Failsafe Cluster - 失败安全 出现异常 直接忽略 会对请求做负载均衡
- Failback Cluster - 失败自动恢复 请求失败后 会自动记录请求到失败队列中
- Forking Cluster - 并行调用多个服务提供者 其中有一个返回 则立即返回结果
信息缓存接口Directory
Directory是Dubbo中的一个接口,主要用于缓存当前可以被调用的提供者列表信息。我们在消费者进行调用时都会通过这个接口来获取所有的提供者列表,再进行后续处理。
- 我们先来看看Directory 接口,这里比较简单,我们可以通过Directory 来找到指定服务中的提供者信息列表。
public interface Directory<T> extends Node {


    /**
     * get service type.
     * 获取服务的类型,也就是我们demo中所使用的HelloService
     *
     * @return service type.
     */
    Class<T> getInterface();

    /**
     * list invokers.
     *
     * 根据本次调用的信息来获取所有可以被执行的提供者信息
     * @return invokers
     */
    List<Invoker<T>> list(Invocation invocation) throws RpcException;

    //获取所有的提供者信息
    List<Invoker<T>> getAllInvokers();

    URL getConsumerUrl();

}
Directory中有一个基础的实现类,主要是对一些通用的方法封装,主要还是依靠真正的实现。其中可以看看AbstractDirectory中的list方法。通过这个方式我们能知道,真正实现还是依靠于真正子类汇总的doList方法。
    @Override
    public List<Invoker<T>> list(Invocation invocation) throws RpcException {

        if (destroyed) {

            throw new RpcException("Directory already destroyed .url: " + getUrl());
        }
        // 交给子类进行处理
        return doList(invocation);
    }
- 我们可以继续往下看,他的实现子类是
RegistryDirectory#doList方法。我们可以看到这里的实现也相对比较简单,主要依靠routerChain去决定真实返回的提供者列表。
    @Override
    public List<Invoker<T>> doList(Invocation invocation) {

        // 当没有提供者的时候会直接抛出异常
        if (forbidden) {

            // 1. No service provider 2. Service providers are disabled
            throw new RpcException(RpcException.FORBIDDEN_EXCEPTION, "No provider available from registry " +
                    getUrl().getAddress() + " for service " + getConsumerUrl().getServiceKey() + " on consumer " +
                    NetUtils.getLocalHost() + " use dubbo version " + Version.getVersion() +
                    ", please check status of providers(disabled, not registered or in blacklist).");
        }

        if (multiGroup) {

            return this.invokers == null ? Collections.emptyList() : this.invokers;
        }

        List<Invoker<T>> invokers = null;
        try {

            // 交给路由chain去处理并且获取所有的invokers
            // Get invokers from cache, only runtime routers will be executed.
            invokers = routerChain.route(getConsumerUrl(), invocation);
        } catch (Throwable t) {

            logger.error("Failed to execute router: " + getUrl() + ", cause: " + t.getMessage(), t);
        }

        return invokers == null ? Collections.emptyList() : invokers;
    }
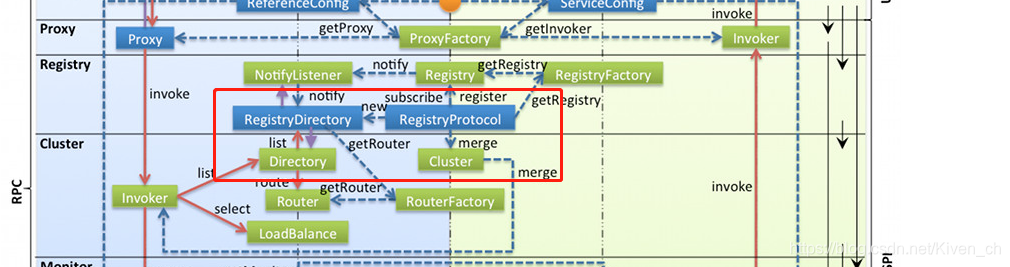
对应到框架图如下

- 路由是如何获取Invoker 列表的呢? 我们观察这个方法:
RegistryProtocol.refer,这里面也是Invoker生成的部分关键代码。
    @Override
    @SuppressWarnings("unchecked")
    public <T> Invoker<T> refer(Class<T> type, URL url) throws RpcException {

        // 获取注册中心的地址URL(主要用于转换协议),比如我们是使用的zookeeper,那么他就会转换为zookeeper://
        url = getRegistryUrl(url);
        // 获取注册中心配置信息
        Registry registry = registryFactory.getRegistry(url);
        if (RegistryService.class.equals(type)) {

            return proxyFactory.getInvoker((T) registry, type, url);
        }

        // 适用于多个分组时使用
        // group="a,b" or group="*"
        Map<String, String> qs = StringUtils.parseQueryString(url.getParameterAndDecoded(REFER_KEY));
        String group = qs.get(GROUP_KEY);
        if (group != null && group.length() > 0) {

            if ((COMMA_SPLIT_PATTERN.split(group)).length > 1 || "*".equals(group)) {

                return doRefer(Cluster.getCluster(MergeableCluster.NAME), registry, type, url);
            }
        }
        Cluster cluster = Cluster.getCluster(qs.get(CLUSTER_KEY));
        // 真正进行构建invoker和上面的Directory
        return doRefer(cluster, registry, type, url);
    }
- 下面再来仔细跟踪
doRefer方法, 这里面就是最主要产生Directory并且注册和监听的主要代码逻辑。所需要的routerChain也是在这里产生的。
    private <T> Invoker<T> doRefer(Cluster cluster, Registry registry, Class<T> type, URL url) {

        // 实例化Directory
        RegistryDirectory<T> directory = new RegistryDirectory<T>(type, url);
        // 设置注册中心和所使用的协议
        directory.setRegistry(registry);
        directory.setProtocol(protocol);
        // all attributes of REFER_KEY
        Map<String, String> parameters = new HashMap<String, String>(directory.getConsumerUrl().getParameters());
        // 生成监听路径URL
        URL subscribeUrl = new URL(CONSUMER_PROTOCOL, parameters.remove(REGISTER_IP_KEY), 0, type.getName(), parameters);
        if (directory.isShouldRegister()) {

            // 在Directory中设置监听的consumerurl地址
            directory.setRegisteredConsumerUrl(subscribeUrl);
            // 在注册中心中注册消费者URL
            // 也就是我们之前的Zookeeper的node中看到的consumer://
            registry.register(directory.getRegisteredConsumerUrl());
        }
        // 构建路由链
        directory.buildRouterChain(subscribeUrl);
        // 进行监听所有的的provider
        directory.subscribe(toSubscribeUrl(subscribeUrl));

        // 加入到集群中
        Invoker<T> invoker = cluster.join(directory);
        // 查找RegistryProtocol的监听器
        List<RegistryProtocolListener> listeners = findRegistryProtocolListeners(url);
        if (CollectionUtils.isEmpty(listeners)) {

            return invoker;
        }

        // 如果有监听器需要通知监听器新的invoker加入事件
        RegistryInvokerWrapper<T> registryInvokerWrapper = new RegistryInvokerWrapper<>(directory, cluster, invoker);
        for (RegistryProtocolListener listener : listeners) {

            listener.onRefer(this, registryInvokerWrapper);
        }
        return registryInvokerWrapper;
    }
这里就对应到架构图中的初始化部分
- 回到RouterChain#route 方法。这里所做的就是依次遍历所有的路由,然后分别执行并返回。这也就是整体的路由规则的实现。
    public List<Invoker<T>> route(URL url, Invocation invocation) {

        // 所有的Invoker列表
        List<Invoker<T>> finalInvokers = invokers;
        for (Router router : routers) {

            // 根据路由规则得到最终的Invoker列表
            finalInvokers = router.route(finalInvokers, url, invocation);
        }
        return finalInvokers;
    }
路由规则实现原理
这里具体来讲解一下RouterChain 中的Router 是如何实现的。这里我们主要对ConditionRouter 的实现来做说明。
- 可以看到这个类中有两个属性比较关键,这两个属性也是判断的关键。
    // 是否满足判断条件
    protected Map<String, MatchPair> whenCondition;
    // 当满足判断条件时如何选择invokers
    protected Map<String, MatchPair> thenCondition;
- 我们可以看到每一个MatchPair 都有这两个属性,分别表示满足的条件和不满足的具体条件。
    // 两个SET分别是匹配和不匹配的具体条件
        final Set<String> matches = new HashSet<String>();
        final Set<String> mismatches = new HashSet<String>();
- 下面先跳过生成规则的代码,先从如何选择Invoker入手。可以看到整体的流程也比较简单,主要在于判断( matchWhen )和选择( matchThen )的逻辑。
    @Override
    public <T> List<Invoker<T>> route(List<Invoker<T>> invokers, URL url, Invocation invocation)
            throws RpcException {

        // 不启用的时,则直接返回提供者的列表
        if (!enabled) {

            return invokers;
        }

        // 如果不存在任何invoker则直接返回
        if (CollectionUtils.isEmpty(invokers)) {

            return invokers;
        }
        try {

            // 判断是否满足判断条件,不满足直接返回列表
            if (!matchWhen(url, invocation)) {

                return invokers;
            }
            List<Invoker<T>> result = new ArrayList<Invoker<T>>();
            if (thenCondition == null) {

                logger.warn("The current consumer in the service blacklist. consumer: " + NetUtils.getLocalHost() + ", service: " + url.getServiceKey());
                return result;
            }
            // 依次判断每一个invoker的url是否满足条件
            for (Invoker<T> invoker : invokers) {

                if (matchThen(invoker.getUrl(), url)) {

                    result.add(invoker);
                }
            }
            // 如果不为空则直接返回
            if (!result.isEmpty()) {

                return result;
            } else if (force) {

                // 如果为空,并且必须要走这个条件时,则直接返回空
                logger.warn("The route result is empty and force execute. consumer: " + NetUtils.getLocalHost() + ", service: " + url.getServiceKey() + ", router: " + url.getParameterAndDecoded(RULE_KEY));
                return result;
            }
        } catch (Throwable t) {

            logger.error("Failed to execute condition router rule: " + getUrl() + ", invokers: " + invokers + ", cause: " + t.getMessage(), t);
        }
        return invokers;
    }
- 可以看到这里判断条件是尽量的简单,甚至可以为空,主要在于判定when 以及是否匹配then规则。两者最终底层都是调用的
matchCondition方法,我们在看他实现逻辑之前,先来确定一下condition 中都存储了什么样的信息。
    boolean matchWhen(URL url, Invocation invocation) {

        // 1. 如果判断条件为空则直接认定为匹配
        // 2. 如果条件匹配则认定为匹配
        return CollectionUtils.isEmptyMap(whenCondition) || matchCondition(whenCondition, url, null, invocation);
    }

    private boolean matchThen(URL url, URL param) {

        // 判断条件不能为空并且匹配条件规则时才返回
        return CollectionUtils.isNotEmptyMap(thenCondition) && matchCondition(thenCondition, url, param, null);
    }
- 最后再来看看他是如何生成整个路由规则的。我们跟进ConditionRouter#init 方法,其中比较关键的方法为parseRule , when 和then 的规则都是相同的。
详细规则参考官网
    public void init(String rule) {

        try {

            // 必须包含规则配置
            if (rule == null || rule.trim().length() == 0) {

                throw new IllegalArgumentException("Illegal route rule!");
            }
            rule = rule.replace("consumer.", "").replace("provider.", "");
            // 根据"=>"来判断when或者then条件
            int i = rule.indexOf("=>");
            String whenRule = i < 0 ? null : rule.substring(0, i).trim();
            String thenRule = i < 0 ? rule.trim() : rule.substring(i + 2).trim();
            // 分别根据"=>"来生成前后的规则
            Map<String, MatchPair> when = StringUtils.isBlank(whenRule) || "true".equals(whenRule) ? new HashMap<String, MatchPair>() : parseRule(whenRule);
            Map<String, MatchPair> then = StringUtils.isBlank(thenRule) || "false".equals(thenRule) ? null : parseRule(thenRule);
            // NOTE: It should be determined on the business level whether the `When condition` can be empty or not.
            this.whenCondition = when;
            this.thenCondition = then;
        } catch (ParseException e) {

            throw new IllegalStateException(e.getMessage(), e);
        }
    }
parseRule方法实现。
    private static Map<String, MatchPair> parseRule(String rule)
            throws ParseException {

        Map<String, MatchPair> condition = new HashMap<String, MatchPair>();
        if (StringUtils.isBlank(rule)) {

            return condition;
        }
        // 当前所操作的数据
        // 用于后面循环中使用,标识上一次循环中所操作的信息
        // Key-Value pair, stores both match and mismatch conditions
        MatchPair pair = null;
        // Multiple values
        Set<String> values = null;
        // 转化每一个条件
        // 这里分别会对每一次的分割做匹配
        // host = 1.1.1.* & host != 1.1.1.2 & method=sayHello
        // 1. "" host
        // 2. "=" 1.1.1.x
        // 3. "&" host
        // 4. "!=" 1.1.1.2
        // ....
        final Matcher matcher = ROUTE_PATTERN.matcher(rule);
        while (matcher.find()) {
    // Try to match one by one
            // 分隔符
            String separator = matcher.group(1);
            // 内容
            String content = matcher.group(2);
            // Start part of the condition expression.
            // 如果不存在分隔符
            // 则认为是首个判断
            if (StringUtils.isEmpty(separator)) {

                pair = new MatchPair();
                // 则直接放入当前condition
                condition.put(content, pair);
            }
            // The KV part of the condition expression
            // 如果是"&"则代表并且
            else if ("&".equals(separator)) {

                // 如果当前的when或者then中不包含该判定条件则添加则放入
                // 否则当前的condition就需要拿出来
                if (condition.get(content) == null) {

                    pair = new MatchPair();
                    condition.put(content, pair);
                } else {

                    pair = condition.get(content);
                }
            }
            // The Value in the KV part.
            else if ("=".equals(separator)) {

                if (pair == null) {

                    throw new ParseException("Illegal route rule \""
                            + rule + "\", The error char '" + separator
                            + "' at index " + matcher.start() + " before \""
                            + content + "\".", matcher.start());
                }
                // 如果是等于的比较,则需要将值放入matches中
                values = pair.matches;
                values.add(content);
            }
            // The Value in the KV part.
            else if ("!=".equals(separator)) {

                if (pair == null) {

                    throw new ParseException("Illegal route rule \""
                            + rule + "\", The error char '" + separator
                            + "' at index " + matcher.start() + " before \""
                            + content + "\".", matcher.start());
                }
                // 如果为不等于,则需要放入到不等于中
                values = pair.mismatches;
                values.add(content);
            }
            // The Value in the KV part, if Value have more than one items.
            // 如果values是多个的话
            else if (",".equals(separator)) {
    // Should be separated by ','
                if (values == null || values.isEmpty()) {

                    throw new ParseException("Illegal route rule \""
                            + rule + "\", The error char '" + separator
                            + "' at index " + matcher.start() + " before \""
                            + content + "\".", matcher.start());
                }
                // 则分别加入到values列表中
                values.add(content);
            } else {

                throw new ParseException("Illegal route rule \"" + rule
                        + "\", The error char '" + separator + "' at index "
                        + matcher.start() + " before \"" + content + "\".", matcher.start());
            }
        }
        return condition;
    }
Cluster组件
再来看看再Dubbo中也是很关键的组件: Cluster 。它主要用于代理真正的Invoker执行时做处理,提供了多种容错方案。
- 首先来看一下他的接口定义。这里在之前也有见到过( doRefer ),那里也是真正调用它来生成的位置。
@SPI(Cluster.DEFAULT)
public interface Cluster {

    String DEFAULT = FailoverCluster.NAME;

    /**
     * Merge the directory invokers to a virtual invoker.
     *
     * @param <T>
     * @param directory
     * @return cluster invoker
     * 生成一个新的invoker
     * @throws RpcException
     */
    @Adaptive
    <T> Invoker<T> join(Directory<T> directory) throws RpcException;

    static Cluster getCluster(String name) {

        return getCluster(name, true);
    }

    static Cluster getCluster(String name, boolean wrap) {

        if (StringUtils.isEmpty(name)) {

            name = Cluster.DEFAULT;
        }
        return ExtensionLoader.getExtensionLoader(Cluster.class).getExtension(name, wrap);
    }
}
- 再来看一下他提供的几种实现,Cluster和Registry 采用了相同的类方式,都提供了Abstract 类来进行统一的封装。
org.apache.dubbo.rpc.cluster.support.wrapper.AbstractCluster
    // 对invoker进行封装
    private <T> Invoker<T> buildClusterInterceptors(AbstractClusterInvoker<T> clusterInvoker, String key) {

        AbstractClusterInvoker<T> last = clusterInvoker;
        // 获取所有的拦截器
        List<ClusterInterceptor> interceptors = ExtensionLoader.getExtensionLoader(ClusterInterceptor.class).getActivateExtension(clusterInvoker.getUrl(), key);

        if (!interceptors.isEmpty()) {

            for (int i = interceptors.size() - 1; i >= 0; i--) {

                // 对拦截器进行一层封装
                final ClusterInterceptor interceptor = interceptors.get(i);
                final AbstractClusterInvoker<T> next = last;
                last = new InterceptorInvokerNode<>(clusterInvoker, interceptor, next);
            }
        }
        return last;
    }

    @Override
    public <T> Invoker<T> join(Directory<T> directory) throws RpcException {

        // 使用子类doJoin来真正生成Invoker
        // 并且使用拦截器的方式进行一层封装
        return buildClusterInterceptors(doJoin(directory), directory.getUrl().getParameter(REFERENCE_INTERCEPTOR_KEY));
    }
- 看看failover 里面都做了些什么。这里面比较简单,只是进行new了一个新的Invoker。
    @Override
    public <T> AbstractClusterInvoker<T> doJoin(Directory<T> directory) throws RpcException {

        // 构建了FailoverClusterInvoker对象
        return new FailoverClusterInvoker<>(directory);
    }
- 通过观察Invoker接口得知,其中最关键的方式是invoke 方法。我们也可以看到,他也是通过
Abstract进行了一层封装。其中我们来看看他的invoke 方法实现。(AbstractClusterInvoker.invoke)
@Override
    public Result invoke(final Invocation invocation) throws RpcException {

        // 检查是否已经关闭了
        checkWhetherDestroyed();

        // binding attachments into invocation.
        // 拷贝当前RPCContext中的附加信息到当前的invocation中
        Map<String, Object> contextAttachments = RpcContext.getContext().getObjectAttachments();
        if (contextAttachments != null && contextAttachments.size() != 0) {

            ((RpcInvocation) invocation).addObjectAttachments(contextAttachments);
        }
        // 找寻出所有支持的invoker,已经路由过的
        List<Invoker<T>> invokers = list(invocation);
        // 初始化负载均衡器
        LoadBalance loadbalance = initLoadBalance(invokers, invocation);
        // 用于适配异步请求使用
        RpcUtils.attachInvocationIdIfAsync(getUrl(), invocation);
        // 交给子类进行真正处理请求
        return doInvoke(invocation, invokers, loadbalance);
    }
- 再来细关注一下
FailoverClusterInvoker中的doInvoke方法是怎么做的。这里的方法也是很简单,主要是通过for循环的形式来达到重试次数的目的,并且每次重试否会重新走一遍路由等规则。
    @Override
    @SuppressWarnings({
   "unchecked", "rawtypes"})
    public Result doInvoke(Invocation invocation, final List<Invoker<T>> invokers, LoadBalance loadbalance) throws RpcException {

        List<Invoker<T>> copyInvokers = invokers;
        // 如果没有任何的invoker则抛出异常
        checkInvokers(copyInvokers, invocation);
        String methodName = RpcUtils.getMethodName(invocation);
        // 获取这个方法最大的重试次数
        int len = getUrl().getMethodParameter(methodName, RETRIES_KEY, DEFAULT_RETRIES) + 1;
        if (len <= 0) {

            len = 1;
        }
        // retry loop.
        RpcException le = null; // last exception.
        List<Invoker<T>> invoked = new ArrayList<Invoker<T>>(copyInvokers.size()); // invoked invokers.
        Set<String> providers = new HashSet<String>(len);
        // 通过for循环的形式表示可以重试的次数
        for (int i = 0; i < len; i++) {

            //Reselect before retry to avoid a change of candidate `invokers`.
            //NOTE: if `invokers` changed, then `invoked` also lose accuracy.
            if (i > 0) {

                // 每次都执行一次是否关闭当前consumer的判断
                checkWhetherDestroyed();
                // 重新获取一遍invoker列表
                copyInvokers = list(invocation);
                // check again
                // 再次进行一次存在invoker的检查
                checkInvokers(copyInvokers, invocation);
            }
            // 选择具体的invoker(交给负载均衡)
            Invoker<T> invoker = select(loadbalance, invocation, copyInvokers, invoked);
            // 增加到已经执行过得invoker列表中
            invoked.add(invoker);
            RpcContext.getContext().setInvokers((List) invoked);
            try {

                // 让其真正的去进行执行操作
                Result result = invoker.invoke(invocation);
                if (le != null && logger.isWarnEnabled()) {

                    logger.warn("Although retry the method " + methodName
                            + " in the service " + getInterface().getName()
                            + " was successful by the provider " + invoker.getUrl().getAddress()
                            + ", but there have been failed providers " + providers
                            + " (" + providers.size() + "/" + copyInvokers.size()
                            + ") from the registry " + directory.getUrl().getAddress()
                            + " on the consumer " + NetUtils.getLocalHost()
                            + " using the dubbo version " + Version.getVersion() + ". Last error is: "
                            + le.getMessage(), le);
                }
                return result;
            } catch (RpcException e) {

                // 如果是业务异常则直接抛出
                if (e.isBiz()) {
    // biz exception.
                    throw e;
                }
                le = e;
            } catch (Throwable e) {

                le = new RpcException(e.getMessage(), e);
            } finally {

                providers.add(invoker.getUrl().getAddress());
            }
        }
        // 如果重试了指定次数后依旧失败,则直接认定为失败
        throw new RpcException(le.getCode(), "Failed to invoke the method "
                + methodName + " in the service " + getInterface().getName()
                + ". Tried " + len + " times of the providers " + providers
                + " (" + providers.size() + "/" + copyInvokers.size()
                + ") from the registry " + directory.getUrl().getAddress()
                + " on the consumer " + NetUtils.getLocalHost() + " using the dubbo version "
                + Version.getVersion() + ". Last error is: "
                + le.getMessage(), le.getCause() != null ? le.getCause() : le);
    }

}
负载均衡实现原理
通过上面看到在Cluster 中经过负载选择真正Invoker 的代码,这里再来细追踪是如何负载均衡的。
- 再次来看看LoadBalance 接口定义。这里默认选择了随机算法。
// 默认使用随机算法
@SPI(RandomLoadBalance.NAME)
public interface LoadBalance {


    /**
     * select one invoker in list.
     *
     * @param invokers   invokers.
     * @param url        refer url
     * @param invocation invocation.
     * @return selected invoker.
     * // 进行选择真正的invoker
     */
    @Adaptive("loadbalance")
    <T> Invoker<T> select(List<Invoker<T>> invokers, URL url, Invocation invocation) throws RpcException;

}
- LoadBalance 依旧选择了AbstractLoadBalance 作为基础的实现类。关注一下select方法。这里的方法也比较简单,主要就是处理只有一个invoker的情况。
    @Override
    public <T> Invoker<T> select(List<Invoker<T>> invokers, URL url, Invocation invocation) {

        // 如果不存在任何的invoker则直接返回
        if (CollectionUtils.isEmpty(invokers)) {

            return null;
        }
        // 如果还有一个invoker则直接返回,不需要执行负载均衡
        if (invokers.size() == 1) {

            return invokers.get(0);
        }
        // 交给子类进行实现
        return doSelect(invokers, url, invocation);
    }
- 来看看默认的随机算法是如何实现的。这里主要比较关键在于权重的概念。通过权重选取了不同的机器, 这里类似轮盘赌算法。
org.apache.dubbo.rpc.cluster.loadbalance.RandomLoadBalance
    @Override
    protected <T> Invoker<T> doSelect(List<Invoker<T>> invokers, URL url, Invocation invocation) {

        // Number of invokers
        // 总计的invoker列表数量
        int length = invokers.size();
        // Every invoker has the same weight?
        // 默认每个invoker的权重都是相同的
        boolean sameWeight = true;
        // the weight of every invokers
        // 所有的权重列表
        int[] weights = new int[length];
        // the first invoker's weight
        // 首个invoker的权重信息
        int firstWeight = getWeight(invokers.get(0), invocation);
        weights[0] = firstWeight;
        // The sum of weights
        // 计算总共的权重,并且吧每一个invoker的权重进行设置到列表中
        int totalWeight = firstWeight;
        for (int i = 1; i < length; i++) {

            int weight = getWeight(invokers.get(i), invocation);
            // save for later use
            weights[i] = weight;
            // Sum
            totalWeight += weight;
            if (sameWeight && weight != firstWeight) {

                sameWeight = false;
            }
        }
        // 如果权重不相同
        if (totalWeight > 0 && !sameWeight) {

            // If (not every invoker has the same weight & at least one invoker's weight>0), select randomly based on totalWeight.
            // 通过总共的权重来随机分配
            int offset = ThreadLocalRandom.current().nextInt(totalWeight);
            // Return a invoker based on the random value.
            // 看看最终落到哪一个机器上去
            for (int i = 0; i < length; i++) {

                offset -= weights[i];
                if (offset < 0) {

                    return invokers.get(i);
                }
            }
        }
        // 如果权重都是相同的话,则随机选取一个即可
        // If all invokers have the same weight value or totalWeight=0, return evenly.
        return invokers.get(ThreadLocalRandom.current().nextInt(length));
    }
Invoker执行逻辑
Invoker就是真实执行请求的组件。这里也会衍生出我们真正的Dubbo 或者Grpc 等其他协议的请求。
- 先来看一下接口定义:
public interface Invoker<T> extends Node {


    /**
     * get service interface.
     *
     * @return service interface.
     * 当前执行器的服务接口是哪一个
     */
    Class<T> getInterface();

    /**
     * invoke.
     *
     * @param invocation
     * @return result
     * @throws RpcException
     * 执行请求操作
     */
    Result invoke(Invocation invocation) throws RpcException;

}
Invoker同样具有AbstractInvoker,其中我们重点关注一下invoke方法。这里同样主要做的是基础信息封装,并且将请求真正的子类。这里面的子类主要是DubboInvoker
	//org.apache.dubbo.rpc.protocol.AbstractInvoker
    @Override
    public Result invoke(Invocation inv) throws RpcException {

        // if invoker is destroyed due to address refresh from registry, let's allow the current invoke to proceed
        // 判断系统是否已经关闭
        if (destroyed.get()) {

            logger.warn("Invoker for service " + this + " on consumer " + NetUtils.getLocalHost() + " is destroyed, "
                    + ", dubbo version is " + Version.getVersion() + ", this invoker should not be used any longer");
        }
        RpcInvocation invocation = (RpcInvocation) inv;
        invocation.setInvoker(this);
        // 设置所有的RPCContext中的附加信息
        if (CollectionUtils.isNotEmptyMap(attachment)) {

            invocation.addObjectAttachmentsIfAbsent(attachment);
        }

        Map<String, Object> contextAttachments = RpcContext.getContext().getObjectAttachments();
        if (CollectionUtils.isNotEmptyMap(contextAttachments)) {

            /**
             * invocation.addAttachmentsIfAbsent(context){@link RpcInvocation#addAttachmentsIfAbsent(Map)}should not be used here,
             * because the {@link RpcContext#setAttachment(String, String)} is passed in the Filter when the call is triggered
             * by the built-in retry mechanism of the Dubbo. The attachment to update RpcContext will no longer work, which is
             * a mistake in most cases (for example, through Filter to RpcContext output traceId and spanId and other information).
             */
            invocation.addObjectAttachments(contextAttachments);
        }
        // 获取执行的模式
        invocation.setInvokeMode(RpcUtils.getInvokeMode(url, invocation));
        // 设置执行id,主要用于适配异步模式使用
        RpcUtils.attachInvocationIdIfAsync(getUrl(), invocation);

        // 交给子类进行真正的执行
        AsyncRpcResult asyncResult;
        try {

            asyncResult = (AsyncRpcResult) doInvoke(invocation);
        } catch (InvocationTargetException e) {
    // biz exception
            // 业务异常
            Throwable te = e.getTargetException();
            if (te == null) {

                asyncResult = AsyncRpcResult.newDefaultAsyncResult(null, e, invocation);
            } else {

                if (te instanceof RpcException) {

                    ((RpcException) te).setCode(RpcException.BIZ_EXCEPTION);
                }
                asyncResult = AsyncRpcResult.newDefaultAsyncResult(null, te, invocation);
            }
        } catch (RpcException e) {

            // RPC阶段出现了异常
            if (e.isBiz()) {

                asyncResult = AsyncRpcResult.newDefaultAsyncResult(null, e, invocation);
            } else {

                throw e;
            }
        } catch (Throwable e) {

            asyncResult = AsyncRpcResult.newDefaultAsyncResult(null, e, invocation);
        }
        // 设置执行的结果信息
        RpcContext.getContext().setFuture(new FutureAdapter(asyncResult.getResponseFuture()));
        return asyncResult;
    }
- 再来看看
DubboInvoker中的doInvoke方法。这里看到,他其实底层更多的是依赖底层真正的客户端实现。
    @Override
    protected Result doInvoke(final Invocation invocation) throws Throwable {

        RpcInvocation inv = (RpcInvocation) invocation;
        final String methodName = RpcUtils.getMethodName(invocation);
        inv.setAttachment(PATH_KEY, getUrl().getPath());
        inv.setAttachment(VERSION_KEY, version);
        // 传输的客户端
        ExchangeClient currentClient;
        if (clients.length == 1) {

            currentClient = clients[0];
        } else {

            currentClient = clients[index.getAndIncrement() % clients.length];
        }
        try {

            // 是否返回值,也就是相当于发送了一个指令,不在乎服务端的返回
            // 通常适用于异步请求
            boolean isOneway = RpcUtils.isOneway(getUrl(), invocation);
            // 获取超时的配置
            int timeout = calculateTimeout(invocation, methodName);
            if (isOneway) {

                // 如果不需要返回值信息(异步)
                boolean isSent = getUrl().getMethodParameter(methodName, Constants.SENT_KEY, false);
                // 发送命令
                currentClient.send(inv, isSent);
                // 告知为异步的结果
                return AsyncRpcResult.newDefaultAsyncResult(invocation);
            } else {

                // 获取真正执行的线程池(ThreadPool中的SPI)
                ExecutorService executor = getCallbackExecutor(getUrl(), inv);
                // 发送请求并且等待结果
                CompletableFuture<AppResponse> appResponseFuture =
                        currentClient.request(inv, timeout, executor).thenApply(obj -> (AppResponse) obj);
                // save for 2.6.x compatibility, for example, TraceFilter in Zipkin uses com.alibaba.xxx.FutureAdapter
                // 在2.6.x中使用,设置完成的额结果信息
                FutureContext.getContext().setCompatibleFuture(appResponseFuture);
                // 创建新的结果信息并且返回
                AsyncRpcResult result = new AsyncRpcResult(appResponseFuture, inv);
                result.setExecutor(executor);
                return result;
            }
        } catch (TimeoutException e) {

            throw new RpcException(RpcException.TIMEOUT_EXCEPTION, "Invoke remote method timeout. method: " + invocation.getMethodName() + ", provider: " + getUrl() + ", cause: " + e.getMessage(), e);
        } catch (RemotingException e) {

            throw new RpcException(RpcException.NETWORK_EXCEPTION, "Failed to invoke remote method: " + invocation.getMethodName() + ", provider: " + getUrl() + ", cause: " + e.getMessage(), e);
        }
    }
- 追踪一下
ExchangeClient接口,发现他有一个最关键的方法。位于ExchangeChannel接口中。
    /**
     * send request.
     * 真实的发送请求信息
     *
     * @param request
     * @param timeout
     * @return response future
     * @throws RemotingException
     */
    CompletableFuture<Object> request(Object request, int timeout, ExecutorService executor) throws RemotingException;
- 底层真实的实现方式是
HeaderExchangeClient来进行处理的。可以看到他只是交给了真实的渠道channel进行数据处理。
    @Override
    public CompletableFuture<Object> request(Object request, int timeout, ExecutorService executor) throws RemotingException {

        return channel.request(request, timeout, executor);
    }
- 这里的
channel会交HeaderExchangeChannel来进行封装。我们来看看他的实现。这里我们需要细看一下Request对象的组成和DefaultFuture里面了做了些什么。这里的Channle对象是通过Transporter这个SPI进行创建的。这里先不细跟了。我们所熟知的Netty协议就是在这里创建的。
    @Override
    public CompletableFuture<Object> request(Object request, int timeout, ExecutorService executor) throws RemotingException {

        if (closed) {

            throw new RemotingException(this.getLocalAddress(), null, "Failed to send request " + request + ", cause: The channel " + this + " is closed!");
        }
        // create request.
        // 创建一个新的request对象
        Request req = new Request();
        req.setVersion(Version.getProtocolVersion());
        req.setTwoWay(true);
        req.setData(request);
        // 创建一个执行结果的回调信息处理
        DefaultFuture future = DefaultFuture.newFuture(channel, req, timeout, executor);
        try {

            // 交给真正的业务渠道进行处理
            // 这里的渠道是交给Transporter这个SPI进行创建的,其中NettyChannel就是在这里产生的
            channel.send(req);
        } catch (RemotingException e) {

            // 请求出现异常则取消当前的请求封装
            future.cancel();
            throw e;
        }
        return future;
    }
原文链接: https://blog.csdn.net/Kiven_ch/article/details/118004134